Sunday 1 December 2013

Mixed Beans with Spicy Butternut


We thoroughly enjoyed this recipe!  I had only ever used Butternut Squash before by painstakingly peeling and chopping the beast, struggling to carve out the seeds and stringy section with a knife, before cooking it into a delicious risotto.  I kept seeing people on blogs just, cutting them in half lengthways, scooping out the seeds with a spoon (can't believe I never thought of that before!) and roasting them in the oven.  So this was my first time trying it this way, plus I decided to make up a mixed spicy bean sauce to go with it.

Ingredients:

1 large butternut squash
1 tin kidney beans (or equivalent amount if you grew your own)
1 tin cannellini beans (or equivalent amount if you grew your own)
1 tin haricot beans (or equivalent amount if you grew your own)
1 tin chopped tomatoes/fresh tomatoes depending on what you have available
1 medium onion
2 carrots - grated
2 large garlic cloves
3 fresh chillis (I used birdeye, which were fairly large for the variety, but use as many as you wish to correctly spice the beans)
2 handfuls fresh spinach
1 handful fresh coriander (I used 4 stems and their leaves)
Chilli powder
Mixed dried herbs (I used a bought one, but you can use whichever dried herbs you love to eat)
Olive oil
Cumin seeds
Mustard seeds
Ground tumeric
Ground ginger
Ground paprika
Garam masala
Lemon juice
Tomato Puree


Instructions (Serves 4 as a generous meal or 6-8 as a side)

  • Set the oven to pre-heat to 180 degrees celsius
  • Chop the squash lengthways - I found it easier to remove the top and tail ends, as little as possible.  You don't need to remove the skin
  • Scoop out the seeds (with an ice cream scoop because its entirely more satisfying)
  • Foil a baking tray and place the squash flesh side up/skin side down on the tray
  • Fold up a piece of kitchen roll and pour on a small amount (equivalent to approx 1 tbsp) of olive oil.  Use this to wipe the surfaces of the flesh to evenly coat in oil, and make sure to get into the area where you scooped the seeds out
  • Sprinkle chilli powder, mixed herbs and cumin seeds onto the surface, in quantities you like to taste.  I put a fair bit of chilli powder on because hubby and I love spicier things. 
  • Place into the oven on the middle shelf and set timer for 45 minutes.

  •  Add oil to a saucepan and heat on lowest heat
  • Chop onion and add to pot along with mustard seeds, cumin seeds, ginger, tumeric, garam masala, chilli powder and paprika.  I usually put approx 1.5 teaspoons of each spice.  If you don't have fresh coriander you can add ground coriander at this stage instead
  • Stir the spices into the onions to coat them.  Allow to cook for 2 or 3 minutes until the onions begin to soften
  • Chop garlic and chillis and add these to the pot, stirring in to coat with spices too 
  • You can raise the heat slightly, but keep it towards the lower side


  •  I used tinned beans because I didn't grow any this year (thanks slugs!)  but you can use dried beans you grew yourself if you prefer.  You can also change the types of beans used to suit what you have.  In terms of cooking, these instructions are for tinned beans, please prepare your dried beans in advance so they are at a quick cooking stage
  • Drain all beans and rinse together
  • Add beans to pot, along with grated carrot and coat with spices
  • Add tomatoes (I used tinned because I'm all out of ripe tomatoes for the moment - some ripening in the boiler cupboard! - but you can use fresh, just make sure to add some water to compensate for the liquid


  •  Stir well and add 3 generous shakes of lemon juice, fresh spinach, tear up coriander leaves and stems and add these too
  • Allow to cook for 3-4 minutes, or until spinach has wilted
  • Add tomato puree (I usually add equivalent to 2 heaped tbsp to thicken up nearly all my sauces)
  • Make sure everything is stirred in well, cover and put down to lowest heat again
  • Leave like this while you wait until the oven timer has gone off
  • When the timer for the squash goes off, flip them over so the flesh is down and the skin up - the spices will have soaked nicely into the flesh now, so you don't need to worry about them falling off
  • Reset the timer for a further 20 minutes


  •  Keep an eye on the spicy beans to ensure they don't burn - stir every 5 or so minutes
  • You want them to just begin to reach a slightly mushy consistency, where the sauce is very thick, but the majority of the beans are still holding shape.  When it reaches this point, turn OFF the hob, but keep the lid on until its time to serve.


  •  When the timer for the squash goes off, check its soft by stabbing it with a blunt normal eating knife.  If it feels about the softness you'd like to eat it at, serve, if not, put it back for another 10 minutes.
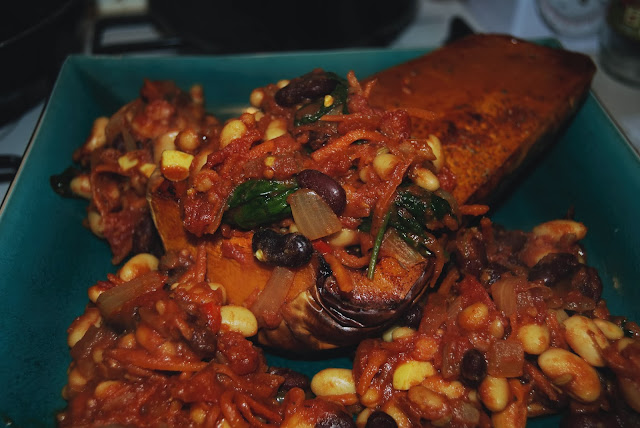
  • For the purposes of the photos I displayed an entire half with the beans, but in reality it is too large a portion so cut the squash halves in half again, and serve with a similar amount of the bean mixture.


  •  My butternut squash was over 25cm long, so it was quite substantial, but if you have a smaller one, half the recipe for the bean mix and it will serve 2.
  • If you're not big on beans you can reduce the amount of this, and serve with a small amount of rice instead of so much bean mix.
  • Enjoy! We sure did!

Friday 29 November 2013

Lessons Learned from Failed Corn

So I meant to post this ages ago, when I actually harvested this, but never got around it it with work getting in the way.  You may remember a post previously about my sweetcorn male flower starting to appear.  Well it never seemed to get any further than that, and didn't open out.  I saw no lady tendrils at any point, which is why I was amazed when I eventually gave up on them and decided to throw them out to find that some sections of the plant were bulbous and hard...


I managed to harvest these from 4 plants (I believe to be minipop variety)


As you can see they aren't really in an edible condition anyway, having been nibbled through by what I presume was a mouse or other type of rodent.  (I used to have pet mice for years, and this really looks like they're kind of nibble).


Most of them had chunks bitten out somewhere, and discolouration.  Its hard to tell in the photo but they were actually quite green.  I stripped off all the lady noodles, and reckon they'd never got properly fertilised because they were just too perfect inside the cases (the noodley parts that is).


The final size compared to my hand.  Pretty poor!  But considering they were unfertilized I guess its not that bad, as least it formed something!  Its certainly been interesting and next time I won't bother trying it in large pots, and just put them straight in the ground!!  This, believe it or not, has been my most successful attempt thus far at corn.  Previously I've managed 2 ft tall plants but never any kind of flowering happening at all.  So at least I'm getting better at it!

Next season I'm going to try the same varieties, because they have had the best germination rates for me so far for sweetcorn (I had one that WASN'T treated this year, and I assume it has some natural fungal resistance because it never had a fungal issue, and I find it germinated much better and faster than any of the treated seeds I've used before).  I'm also trying out Strawberry Popcorn next season, which looks gorgeous to grow.

Anyone have any advice on corn growing for my next try?

Thursday 28 November 2013

Lessons Learned: Growing Cucamelons

This is the first in a new group of posts called "Lessons Learned" about specific types of plant, or gardening in general.  I'm starting with Cucamelons because I have had a lot of interest and questions asked about them!
Directly after a good feed! (Which is why the soil looks so wet, light and muddy)
I first discovered these when looking for exotic seeds, and came across James Wong's online shop.  I'd heard of him through the "Grow Your Own Drugs" fame (to my knowledge, his first book).  But I hadn't read it.  I was actually looking for information on growing Inca Berries when I came across his website and was intrigued by the Cucamelons.  They just looked so damn cute!!  I thought at first they were a savoury gherkin type of pickling cucumber, but he describes them as "cucumber with a tinge of lime".  That makes me think they're more like a grape perhaps?  A bit more acidic?

So I got hold of some seeds and went ahead and planted them and they GREW FAST.  I had, what I thought was 2 straying vines, in a tiny 5cm diameter pot, and they trailed for about 60cm!  This all happened within the space of a week or so.  Now, I did plant them pretty late in the season, because I was just too desperate to try them out and see what they were like, and wasn't really expecting them to do anything.  So I was very impressed with the rate they grew at.  I re-potted them to discover there were in fact far more than 2 plants, but actually 6.  You can see my previous post about them here.

Now since repotting, I tried to train them up a trellis and they began to start flowering, but none of the fruits set sadly.  I would have hand pollinated, but the flowers never matured to open properly.  I think the reason for this was by the time they flowered, it was getting too cold for them.  It was sort of expected though with planting them so late.  Despite not having any literal fruits of my labour, I have certainly learned a lot about growing these, the main points of which I will share:

  • They seem to grow well pot bound, much like tomatoes (in my experience) as their growth slowed considerably after moving to a larger pot, even after the initial "shock" period where plants are still getting used to their new root space.
  • They like the shade.  I considered that they might want more sun after I re-potted them (and due to the lack of room for a larger pot on the shadier side of the greenhouse, I moved it to the sunny side too).  Really though, they haven't done nearly as well in terms of growth in direct sunlight as they managed while creeping between larger pots.
  • Don't let them get too wet/waterlogged because they don't handle it well.  I watered them the same amount as a fruiting chilli plant, forgetting really that they are much, much smaller, and don't really need nearly as much water.
  • They don't like being fed very much.  I presumed when the flowering began that it was time to start feeding, but they actually slowed growth after this and stopped producing flowers.   I'm not sure if feeding them once the fruits are developing (after pollination is successful) would be beneficial or whether they are best left alone.  Consulting James Wong's 2nd Book, "Homegrown Revolution" he does recommend feeding, so it could just be that I need to use a feed with a higher level of potash in future.
  • They don't like too much attention.  I hate to say they "thrive on neglect" but to be honest, I considered the seed hadn't germinated and I'd just leave it a little longer.  Next thing I knew I was preoccupied with chillis and tomatoes and one day discovered this adorable tiny vine creeping around a load of chilli stalks.  Once I realised what they were I began to pay them huge amounts of attention and think I would have been better just admiring from afar.
  • They are delightful to grow and have enchanting miniature melon/squash/cucurbita-style vines.   I would highly recommend for a delicate lacey trellis or a hanging basket (I'm going to try them in a hanging basket next season).
  • I would also recommend for a windowsill box of some kind.  Although they will get very long and trail, they're miniature leaves aren't as invasive as the likes of a real sized squash, and the limited light they would get on a windowsill would suit them better in my opinion.
I'm actually going to try to overwinter them.  At first I didn't know whether to try to fleece them or just leave them alone and see if they make it, since they don't seem to get on better if I just leave them to do their own thing.  I considered even moving the strongest looking one to a smaller pot of its own and considered discarding the rest/or just leave them alone.  I do have more seeds to start again in spring, but it would be nice if I could indeed salvage something from this initial experiment!  Interestingly however, "Homegrown Revolution" also says they can be either mulched or lifted and dried like a bulb to be replanted as a perennial rather than an annual.  I'm not sure if that would work easily in my case, as due to a late planting they may not have formed the fully thicker root stage that is the part you would need to lift and dry until spring.

I lifted them to see, and only some of them, as I guessed, have formed the thicker roots.  They still appear to be very small, but since the vines are so tiny I actually don't really know if this size is expected or not?  I am drying them out to store, and I may replant one in a single pot and keep it indoors with some mulch to see how it copes and if it comes back.


I'm not sure if the root balls should look more bulb like to be honest, but this one is the most developed, with the section above it being obviously woody compared with the delicate vine.

I have certainly learned a lot growing these, and though I've yet to taste the fruits I'm thoroughly excited about what they might bring in the future, as they are an enchanting little crop to grow with very fast growth, so its quick to see some results.  I'll be replanting the tubers and starting some fresh seed just in case the tubers don't work out much earlier next year, and can't wait to see how they get on.

Wednesday 27 November 2013

Winter cometh

Just wanted to share the beauty of my blueberry even as winter sets in.  The frost covering the soil is simply gorgeous.


Though the bucket for catching rain water has frozen solid! (I am planning to get a water butt next year).  The half brick is to weigh it down because its very windy in my area, and its full of leaves.


And finally my fruit bushes all together (nearly,  there's a few elsewhere due to space).  I am hoping to transplant some to the ground maybe next Autumn when they're a bit bigger and I have had time to clear and prepare the area.


Simple Black Russian Tomato Pasta

What is this?  A recipe!?  I actually LOVE cooking, but barely have time to do it.  Normally I love to cook curries and rich sauces the most and play with the balance of flavours and nuances.  So this recipe is incredibly simple, because I was dying to use my Black Russian tomatoes that I had ripening in the boiler cupboard.


Depending on your screen you might not be able to see the full, gorgeous colouring of a Black Russian tomato.  It is not simply red but a deep, rich pink, with a dark brown, almost black pattern on the top.  Interestingly, as you will have seen previous posts, they grow with a darker green section on top prior to ripening, rather than being all the same and changing post ripen.  (see below)


Oh look its Triplette!
So, you can obviously change this around and add more into it if you like, but I found the flavour of these tomatoes was so strong and perfectly complimented the onions.

Ingredients: (Serves 2 as a small portion accompanying pasta, feel free to adjust levels to suit the number you are catering for)

- 3 Large Black Russian Tomatoes - Make sure they are fully ripened as the top ripens later than the bottom
- 1 medium or large onion (I used a brown onion, and we only use large ones because we love onion)
- Fresh or frozen peas (or sweetcorn if you have any, I sadly had run out!) - I use a large amount, approx. 2 cupped handfuls, but it depends how much you like them, and I also used frozen ones in this particular case
- Ground cumin
- Ground tumeric
- 1 generous teaspoon Garlic, ginger & chilli paste (we always have a ton of this made up for curries, but basically chop equal amounts of these 3 ingredients finely and blend into a near-puree state.  You can keep this in the fridge in an airtight container for around a month, but its best used fresher if possible).
- Fresh coriander leaves and stems, torn into smaller pieces


Instructions:

- Chop up tomatoes into small pieces (I like the skins so I never take them off, but some people don't, so feel free to skin them at this point)
- Heat oil in a pan on a medium-low heat and chop onion
- Add the tomatoes first so that they sear slightly
- Add the ground spices, garlic, ginger & chilli paste and stir to mix into and coat the tomatoes
- Add the chopped onion (as I said, if you're not a big onion fan, add less/a smaller onion)


- Stir in onion so this is also coated with spices.  If you are looking to go spicier this is the time to add any optional extra chopped chillis or powders, so that they mix well with the oil and the other spices
- Boil some water in a separate pot, add a vegetable stock cube and cook some pasta (appropriate amount for however many you are serving).  Typically I like mine served somewhere between al dente and mush, but you can obviously adjust according to how you like yours


- Add peas - I used frozen, so as they heat up, they provide water to the sauce.  If you are using fresh, you will need to add some water to thicken into a sauce

- After adding the peas cook for a minimum of 5 further minutes, add fresh coriander torn up until wilted, and serve on top of the pasta.  You can also add basil but I didn't have any ready because I'd harvested much of it the night before for a different meal. 

If you want a more sauce-like sauce, cook for longer and add more water.  I served with the onions still a little on the more crunchy side, because I feel it better compliments the flavour of this particular tomato.

My tomatoes were very high in flavour, so I only needed three to get a big impact, and they balanced nicely with the strong onion flavours.  I highly recommend growing this variety to anyone who hasn't tried them before.  They are a delight to grow and even more delicious than they look.  They have a rich, tangy flavour and go far in terms of flavour strength.  I haven't tried them raw yet, but I imagine their colouring would add interest to a salad dish.  I fed the plants weekly while growing fruits.

Tuesday 26 November 2013

Final tomato harvest and some weirdos!

Apologies for my recent disappearance!! Some of you may know I had a job interview, which was originally scheduled for last week but was postponed to today instead.  Thankfully on my part, because due to my boss being on holiday, I've been managing the entire time he's been away, and as we're open 7 days I have worked 10 days straight, followed by a day off to act upon bridesmaid duties and sew my suit for my interview like a mad thing.  Then back to work and FINALLY off again today to have my interview and its the first time I've been able to get into the garden in about two weeks, particularly in DAYLIGHT, which seems to have almost left Scotland lately altogether. (The interview went very well for anyone wondering, and I'll let you know how I got on when I hear back next week).


So today I only really had time to check on everything and quickly water it.  It was like a mad chilli jungle, with them having flowered yet again and producing fruits all over the place.  A bit odd, not sure if this is like a last gasp defence mechanism or not.  I still have a bazillion of these plants though, so I will definitely be overwintering at least a few of them.  

I decided it was time to call it a day with the tomatoes, and brought them all inside and cut off the remaining fruits, which I will ripen in the boiler cupboard.  Although I've never read about it before, I'm going to experiment with overwintering tomatoes.  It sounds totally mad, since I've never heard of anyone even trying this before, but I figured why not give it a go since I'm overwintering a bunch of other things anyway.  So I pruned them all down to the point where they can still grow in the side shoots (that I would normally pinch out).  I plan to put them into very deep pots and allow the lower stems to build a really strong root system and I'm hoping this might mean the plants survive long enough to start re-sprouting later.  We will see!  I will likely keep them indoors if not in the greenhouse during this.  I have planted some side shoots which I let grow then cut off a few months ago and they are all doing extremely well in the greenhouse, they are lovely and green, tall, though height growth has slowed as its gotten colder, and they are clearly hydrated and holding water very well.  So I will leave them in the greenhouse and monitor them to see if they actually make it through to spring, when I hope they will start growing up again.  

So now for my harvest!  There's a mix of Black Russian, which is the one with ridges and is dark green on top.  They ripen to red with almost black on top.  There's also moneymaker and roma and a couple chillis in there too.


Roma performed very...non existantly this year.  All my tomato plants produced, and I know at least two of them were Roma as far as I know (there should have been 2 of each of the three varieties)  but the cross pollination of them saw most of the plants producing Black Russians and Moneymakers on the same plant on multiple plants!  I have only seen one distinctly Roma-esque tomato.  So its clearly the weaker of the three.  I would say that Black Russian is the more dominant one, but they take the longest to ripen.


And who is this little weirdo?


I call him Triplette, (because you know, I name and genderise all my tomatoes...), and its literally a single tomato, split into three at the bottom, but attached at the top.  The "scars" on the fruit are from the flower petals which were stuck.  I didn't see this one when it first grew until it got quite big, so I didn't pull the flower off, and as a result the tomato grew through the middle and around the outer edges as the flower was pushed away from the stalk, resulting in this.


It has this brown section on the underside of both edges of one segment of the tomato.  It seems to be the equivalent of a tomato ectopic pregnancy.  The seeds have been produced on the outside of this section, instead of inside.  They are very small and the surface appears more similarly to a strawberry.  It will be interesting to let this one ripen then cut it open.  I'm not sure it will be salvageable as edible, but it will certainly be interesting!


Now that I trimmed it off, I'm not sure if this IS a chilli, or rather a sweet pepper.  I'm sure I'll find out.  I forgot to label well, ANY of my chillis or peppers (fool that I am with having so many) but I may well have got some cross pollination from them too.

I have lots of posts cued up to go, so now that my interview is over, and even if I get the job I wouldn't start until January, so I'm hoping I can get enough time actually out of work to get some more daylight photos and updates on garden renovations and who/what is being overwintered!  (I saw who, cos these plants are basically my children) :P  It's nice to be back!

Tuesday 19 November 2013

Apples

So, I'm very fussy about apples. I only like one type an that is Granny Smith.  I like them tart.  Now, I guess I should investigate this but is Granny Smith actually just an early picking stage of a different variety?  Because although I'd planned to start from seed anyway, I've only ever seen a Granny Smith for sale as a plant in one gardening catalogue, and most that do fruit trees have a huge range of apple varieties.  So either they are rare or don't sell well because not that many people like them?  I'm not sure!

I did start some from seed a while ago, I was thinking it was a failed attempt as after planting about 6 seeds (the contents of 1 whole apple) nothing appeared for at least a good two months.  I get impatient waiting for plants to sprout, because I just love watching them peep through the soil then grow and mature into something so different from how they started out.  But finally, something popped up!


I was thrilled, though some pesky slug (I presume) came along and nibbled the entire top off.  But no worries, another sprout popped up, this time left alone by slugs.  Though again after about another month this it had gotten...about 2cm above the soil.  It seemed to be getting eaten alive by greenfly, and having not seen a ladybird all year I thought it best to bring it inside to nurture the tender creature.  Turned out eggs had been laid in the soil, because soon enough the coriander pot right next to it on the windowsill was bombarded with greenfly too, literally coated in the buggers!  I threw it out, luckily I had another coriander pot completely unscathed.

Anyway, back to the apple.  Once I brought it inside, the following morning a new sprout had appeared out of nowhere, and reached twice the height of the existing one.  Kind of like when your younger sibling grows up to be much taller than you so people assume he's the older one.  Since they were just in a starter pot (really a disposable plastic cup with some drainage holes cut in the bottom) I knew it was time to pot them on soon.  I gave them another week in their tiny pot in case any more sprouts appeared, but nothing came of that so they're now resting in their new spacious pots, next to each other.


I'll be keeping them indoors over the winter because they're so tiny and tender right now, plus the greenhouse isn't heated so I know it will get too cold for them.  I'm hoping they'll grow a fair bit in spring before I move them outside around April/May depending on the frosts.  I might move them to the greenhouse first.  It's going to be a long time before I can get my own Granny Smith's from these trees, but the satisfaction that will have come from growing these from seed to fruit will be oh so sweet.


Monday 18 November 2013

Triple Thank You!

I came onto blogger to post one thank you post, and discovered I had been featured as Blog of the Month for November on Jo's The Good Life!  So two thank yous are now in order, but I start at the beginning...

I recently won Mark's Seed Giveaway for Winter Lettuce Mix over at Mark's Veg Plot. (One of my favourite blogs). I was totally thrilled, having never won a thing in my life before and because I've never grown any lettuce other than one which didn't turn out to be what it was meant to be, (Though it was delicious, whatever it was!) and so I'm never sure what varieties to try.  


Mark not only sent me the Sarah Raven "Best Winter Lettuces Mix" (which contains seeds for varieties "Can Can", "Green Salad Bowl" and "Merveille de Quatre Saisons") but also some delicious looking radishes, which are Plants of Distinction "Cherry Belle".  I've never grown radishes before, and in fact I've only eaten one once (It was lovely though) so I'm really excited to grow these beauties.  I hope mine turn out as tasty looking as these.  It was also great to have some email conversation with a fellow chilli enthusiast! Thank you very much Mark! :)

Onto my second thank you! Jo's The Good Life, (another of my favourite blogs), featured me as her Blog of the Month for November.  I'm totally thrilled!  Not only did she have some lovely compliments on my blog, but I found it interesting both from her and her commenters, on what aspects of the blog they really seemed to find interesting and enjoy.  The exotic vegetables seem to be a point of interest, which is really why I grow them, because they are so interesting and unusual to grow, so it makes a change from the standard style crops, and its fascinating to see how they grow in this climate compared to their native one.  It's also given me ideas for a new blog segment, so a huge thank you to Jo for the feature.

Now, for the triple to make sense there does need to be a third thank you.  Who would that be?  You.  My readers! I just want to say thank you for a vast amount of support I've gotten from the gardening online blog community (and some foodie/cooking blogs too).  I've never felt so welcomed.  As I mentioned in a previous post here when I first entered the online community aspect of gardening I made the mistake of visiting forums, and it was a very closed door, my presence was entirely unwanted kind of experience.  I think because in other hobbies the way to communicate with others was only really done by forum, so I figured it would be the same.  I'm not saying all gardening forums are horrible, but I think blogging is actually much more rewarding, because you get to really see in great detail how plants have developed for each person growing them, and learn new tips and tricks from everyone's own unique methods.  It's so much more personal and I feel like I can ask questions directly so easily and get a useful answer.  I'm really enjoying this aspect of the hobby as much as I am the gardening itself.  So thank you, all of you! :)

Tuesday 12 November 2013

Autumn Colours


Summer...


Autumn :)


(Sorry these were taken at dusk and the light is pretty rubbish)

Tomorrow I'm revamping the garden and going to buy compost and set up a bunch of raised beds.  I've also applied for a job this morning, had a driving lesson where I made huge progress, and came home to find I had an interview next week for said job.  And this is a biggie one, so fingers crossed. Sadly between work and prep for the interview I won't get a lot of time in the garden this week, but fortunately its come at a time when everything is slowing down anyway!

Saturday 9 November 2013

Still Autumn

Though its starting to feel like winter,  its still autmn as far as the view while I eat my lunch is concerned

Thursday 7 November 2013

Cold & Wet

Apologies for the extreme lack of updates!!  There are several reasons for this, one being that when I'm at work its always a 10-hour shift, plus commute, and I've had to pick up some extra shifts because the boss has been ill and I'm basically management when he's not there.  Another has been that its super soaking and cold right now, and really too wet to do anything in the garden right now.  But now that our first frost has finally happened (over a month later than predicted on the weather website I checked it out on in August) the rain has gone off but its extremely windy!

I fleeced a few of my plants, my almond, who went into autumn mode before any other plants, my goji berry (who still thinks its the height of summer and is producing new branches and is filled with greener than green leaves) and my blackcurrant, which is just realising autumn has appeared.  I noticed some white fungal symptoms on some of the leaves of my goji berry, and trimmed some of the branches which seemed worst effected, but I'll have to look into what it might be to stop it getting any worse.  So far the fleecing has proved to be problematic and helps the plants catch the wind and causes their pots to fall over, but thankfully the goji berry has a massive heavy pot, otherwise I would be quite worried, because its a huge plant!  Should I be fleecing my other fruit bushes?  They seem quite acclimatised, particularly the blueberry who is a gorgeous shades of red and orange.  I wouldn't have bothered with my almond, since its already pretty barky, but its still very small and having never grown one before I thought it best to be safe.

My tomatoes are STILL producing new tomatoes, but I picked the massive giants I was waiting on to ripen indoors, but they're being pretty stubborn! Much of my greenhouse doesn't seem to know its nearing winter...

Check out these triplets:

My strawberries also seem to think its perfect fruiting time...though I've heard that sometimes these are planted for a November harvest before, so maybe its normal?  They were planted late, I was hoping to try to overwinter some.

Got my new fruit bush canes planted, potted and out.  (Loganberry, Raspberry, Gooseberry, Blackberry and a new variety of Blueberry) I still have a lot of weeding to make new beds to do, and planning the beds as well as finally getting my garlic and onions out.  So hopefully lots of updates to come now its drier!

Tuesday 15 October 2013

Egg Shells


So for a while now I've been using this excellent recipe for fertilizer using banana skins and egg shells.  But I keep finding that its a nightmare to get the eggshells out of the smoothie maker afterwards, because it does such a good job of pulverising them!  So I decided instead to pre-crush my egg shells, which I can then add to my now adapted recipe of a banana skin and nettle cocktail.  This way I can just add them after in the jug and mix in, saving me bags of time cleaning that damn thing.


So it also means I have crushed shells available to scatter on top of stuff (to deter those pesky slugs!) and to mix into soil.

Why didn't I think to do this before!?

Just some herbs


The egg shells on the surface of the soil seemed to be keeping the slugs and snails away after all, but I decided to bring the coriander in to sit on the kitchen window, because it also makes it easier than having to run out to the greenhouse in the middle of making a meal.


Some basil a co-worker gave me as a gift when she moved away (I gave her a lavender plant).  There's some purple basil in the back too, but this all died back as the green seems more successful at competing for space.  The oddest part about this is the OUTSIDE of the pot is growing mould.  I've never seen that before!  The basil is extremely delicious though, I've basiled up a fair few recipes of late ;)

Cucamelons

These adorable little plants grow like mad but they're like miniature watermelons, and their little leaves and flowers are itty bitty!


They've really grown fast and kind of everywhere, I love trailing plants!  I re-potted them about a month ago, thinking there were only 2 which had germinated.  Turns out there were actually 6, but each "one" had been three interwoven together.  So there are actually some which are much smaller and less developed, so glad that I re-potted them to give them a bit more space.  I'm impressed how long they got to in their tiny 9cm germination pot.

Teeny Tiny Cucamelon
I've put them up against a trellis to trail up, and they've had a few flowers going so hoping to get some lovely cucamelons soon.  I've not tried them before.  Though the trellis will work and look lovely, I think these would work equally well as an adorable hanging basket.  Think I'll try that out next season.

They also were germinated really late, so not really expecting much from them, just wanted to see what they grew like really!

Monday 14 October 2013

Mango root!?


So, ever since early spring, I've been planting every mango seed from every mango I've eaten.  Sometimes I just plant them, sometimes I tried the water method, all to no avail.  I always tried to plant them right away, assuming this type of seed can't be stored long-term.

Well with the last one, I thought its too cold to plant something new like this, so I'll put it in a plastic bag and put it away in my seed boxes, and if its not rotten by spring I'll try then. (Didn't have a lot of hope for this).  So I was going through my seed boxes the other day to add in the new packets which arrived and thought I'd check on it...and there's a root, with some condensation it seems to have produced on its own, so its literally watering itself inside this tiny plastic bag.  Its had pretty much no light, which may have been to its benefit!  I'm going to leave it in here a little longer and see how much it grows on from here.  I noticed the opposite end (I'm presuming the end which turns into the seedling) has started to tinge green, so I might need to pot it up fairly soon.  But I just thought it was quite fascinating how this happened!

Courgettes & Squashes

Female flower soon to open on Spaghetti Squash

You have no idea how long I have been waiting to see this.

FINALLY.  Ladies arrive on the squash and courgettes.

My courgettes always seem to have the male ones out for a month or two, then usually when the female ones come along, they've stopped producing male flowers, which obviously causes some issues...BUT there are still some with male flowers on, as well as the females, so fingers crossed I can pollinate something.  I'm not sure if both the courgettes and squash have the male flowers remaining though, as I've stuck them all together and not really looked at the labels...so might end up with some interesting hybridisation, but we'll see if anything takes at all.

Spaghetti Squash leaf compared with my hand

These guys are a bit behind because the first set of squashes and courgettes never germinated.  I don't know if it was still too cold because we had snow until so late in the year this year, or just bad seeds or what.  But they're a bit behind.  So I was thrilled to see flowers appear at the end of July.

Is it normal for the male ones to be out so long before female flowers appear? (Literally 4 months)  Or is this a container growing kind of issue?  I'm hoping to plant out the courgettes and squashes in raised beds next year, and maybe start them off in the house instead of the greenhouse, to counteract the potentially long-assed winter again.

Not expecting much to come of these now its pretty cold.  I'd be lucky to get something small to harvest at all now.